CSV
A comma-separated values (CSV) file is a comma-delimited text file used to store tabular data (numbers and text) in plain text. The file contains lines of data records that consist of one or more data fields.
The CSV connector by IConduct allows retrieving data from .csv and .txt files. The connection is carried out using the Microsoft.ACE.OLEDB.12.0 driver.
Prerequisite: In cases when your text table contains DateTime, Currency, or Decimal data, or similar, the Schema.ini configuration file should be applied. The Schema.ini file serves to define that all the numeric field values should be treated as a text field during data import and to avoid any incorrect data conversions that can occur in Excel tables.
Using a text file, create Schema.ini and type these lines:
[filename.csv] - file name. The name of your .csv/.txt file should coincide with this file name in the Schema.ini file.
ColNameHeader=TRUE/FALSE – indicates whether the .csv/.txt file includes a header.
MaxScanRows=0 – the number of rows to scan in the .csv/.txt file. With value=0 the entire file is scanned.
Format=Delimited(|) – delimiter format, which can be '|',’,’, ‘;’or ‘/’.
Columns – list of all columns from the .csv/.txt file.
Save the file as Schema.ini into the same folder with your .csv/.txt file.
Example:
File name:
Schema.ini
File contents:
[customers.csv]
ColNameHeader=TRUE
MaxScanRows=0
Format=Delimited(|)
Col1=Company Text Width 100
Col2=Legacy_customer_code Text Width 100
Col3=Name Text Width 100
Col4=Order_Externalid Text Width 100
To configure the CSV connector, follow the instructions below:
- In the Admin Navigation tree, select Connections and click New.
Connections Section in the Admin Navigation Tree
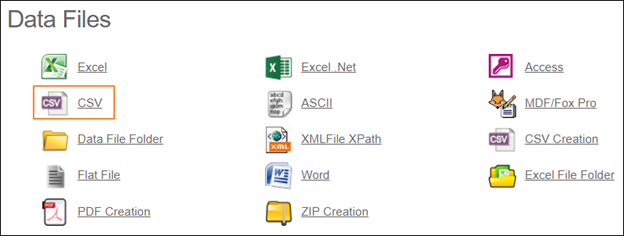
- On the Connector Selection Page select the CSV item from the Data Files section.

Connector Selection Page
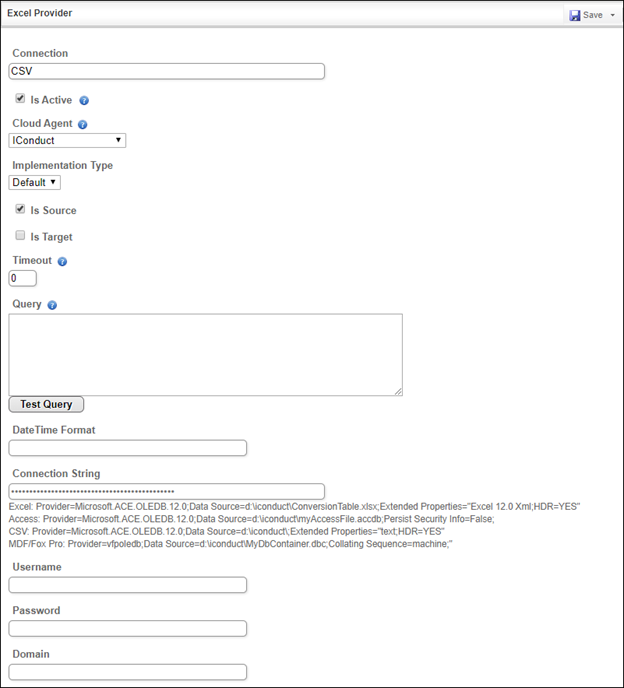
- In the Excel Provider work area, fill in the following fields and click Save.

Connection Work Area
| Field | Description |
|---|---|
|
Connection* |
A new connection name. Enter a connection alias here. |
|
Is Active |
Toggles connector’s activity at interface execution. Enable the checkbox to activate the connection for execution. |
|
Cloud Agent* |
The LAN you are working with. Select "IConduct" for cloud systems and your corporate agent for internal systems.The CSV connector works with the local agent installed on the same storage where the .csv/.txt file is kept. |
|
Implementation Type* |
Defines the implementation type. Select from the drop-down list:
|
|
Is Source |
This connection entity is available as a data source for Import (writing to Schema). Enable the checkbox to ensure data import. |
|
Is Target |
This connection entity is available as a data target that receives data from schema to current data container. Enable the checkbox to ensure data export. |
|
Timeout |
The length of time (in milliseconds) the IConduct platform waits for a response from the connection provider before returning a timeout error. Set the time value to stop the system from connection attempts. |
|
Query |
The box is intended for entering a query. You can test the defined query by clicking Test Query once the connection is saved. It’s recommended to test the query after the connection testing. |
|
DateTime Format |
Not used in this connector. |
|
Connection String* |
A string that specifies information about a data source and the means of connecting to it. Specify the name and file type in the Connection String field. Example: Provider=Microsoft.ACE.OLEDB.12.0;Data Source=d:\iconduct\;Extended Properties="text;HDR=YES" where Provider – driver type; Data Source – source folder; Extended Properties – file type; HDR=YES" - indicates that the first row contains column names, not data; HDR=NO" - indicates the opposite. |
|
Username |
Used for impersonation to perform operations with the connector on behalf of the mentioned user. Enter the username here. |
|
Password |
Used for impersonation. Enter the user password here. |
|
Domain |
Used for impersonation. Enter the required company domain name here. |
* - mandatory fields
Once the connection is saved, you can test if it is successful. Click Test Connection in the toolbar. If the created connection works, you will receive a success message.
Testing the Connection
